The Parts download contains everything you need to get an Altium DBLib library up and running in less than 5 minutes.
You do NOT need to have Access installed to use a DBLIB library in Altium.
Using Altium's DBLib interface you can edit and add parts to an Access database.
Take the challenge and see for yourself that you can have your own fully functional DBLib library in 5 minutes or less.
Here are the steps to quickly setup and use the Parts DBLib library:
Download Parts DBLib.
Install the Parts DBLib Library in Altium. See Getting Started.
Use Altium's DBLib to edit or add parts to the database.
You are done, you should have a fully functional Altium DBLib library.
If you are looking for an efficient and easy way to edit and add parts to the database give the Parts Frontend a test drive.
The Parts DBlib download includes a demo version of the Parts Frontend. A Frontend application is not required to use an Altium DBLib or SVNDBLIB library.
When using a well designed database Frontend you will spend significantly less time designing library parts, leaving you with more time to design boards.
That's It !
Saturday, November 14, 2015
Tuesday, October 20, 2015
What Makes Parts Different ?
When you download Parts you get a functional Altium DBLIB database library for Free.
It takes less than 5 minutes to download and start placing parts from the Parts DBLib library. See Getting Started.
An optional (not required) Frontend application is available for users that are looking for a turn-key solution with a user friendly interface.
Using Parts you can quickly enter parametric data into your library.
The WorkFlow for creating components using Parts is very efficient.
Trim and Clean removes extra white spaces and formatting characters in the database.
Option to use Preferred Mfr and Supplier names.
Parts simplifies Backing up and Compacting the database library.
Easy Migration to MySQL with 100% compatibility to the Parts Access database.
Parts includes Export to Excel and Import from Excel with field (parameter) mapping.
Parts has Configuration options that support a variety of customer requested features.
Make Like and Drag and Drop makes creating similar components simple and fast.
To request technical support or a demo use the Contact Parts page.
No IT department support is required for getting started with Access. Users only need read and write permissions to a shared folder on a local or network drive. User permissions to the database can be controlled using folder permissions.
Parts Supports Multiple Users
See the Videos on YouTube
See Can MSACCESS be shared in a dropbox ? - Google Search
Request Support:
Contact Parts for technical support or a Free online demonstration.
Request Support:
Contact Parts for technical support or a Free online demonstration.
That's It !
Friday, July 24, 2015
Configure and Distribute Parts
Configure the Parts application
The Parts librarian can easily configure and distribute the Parts Frontend.
Use the Frontend application to create and save the configured application.
Then Zip up and distribute the configured Parts_Frontend to your users.
Zip up the Parts_Frontend file and place the Zipped file in a shared network drive folder.
Instruct users to copy the zip file and extract the Part_Frontend file in a folder on their local C:\ drive.
Notes:
If users have Access 2010 or higher installed on their machine they can run the Parts_Frontend.accde.
If the users do NOT have Access 2010 or higher on their computer they can install the free Microsoft Access runtime and run the Parts Frontend.
Steps for Upgrading to the latest version of the Part Frontend:
Save a copy of your existing Parts Frontend in the event you want to roll back to the older version.
Download and Drop the latest Parts_Frontend in the same folder where your previous version of the Frontend was installed.
Place the Zipped and Configured Parts_Frontend file in a shared network drive folder.
To keep the users on the same version of the Parts Frontend, instruct users to copy and extract the zipped Parts_Frontend file to a folder on their local C:\ drive.
Related Link: Moving and Sharing Parts
That's it !
Sunday, June 28, 2015
Export to Excel
To Export the Entire Parts Database > Select Tools > Export

Checking Acquire Models will copy Symbol and Footprint files.
The Acquired Models folder will be created in the same folder as the Exported data.
To Export Filtered Records > Select Filter > Export.

Tip:
To Prevent overwriting the ID Field (Primary Key) you may want to delete the ID column in the exported Excel workbook if you are planning to merge or append the exported data with another Parts compatible database.
That's it !
Saturday, June 13, 2015
Import Excel
Excel data can be imported to restore or add and update the Parts database.
Bill of Materials can be imported.
Select Import to append and update records in the Parts Database.

The above description was built by concatenating fields (parameters):
Part Type, SubType, Value, Tolerance, Voltage Dielectric and Package Case
Use Preferred Names
This option can be used to create consistent Supplier and Mfr Names uisng data found in the mfrs_links and suppliers_link tables,
Make Library Paths
This option can be used to create Library Paths by prefixing Library Refs with Footprints\ or Symbols\ when a BOM is imported and the Library Ref parameter is included. Parts will attempt to build the Library Path if this option is enabled.
Required fields are determined by properties that are set in the Backend database.
New part numbers are appended and all records with matching IDs are updated.
Tips:
The Import data updates all records in the Parts table where the IDs in the Source data match the IDs in the Destination table.
The Import command can used to append and update the Destination table from the imported data.
Map parameters in the Source and Destination tables.
Select Import to append and update records in the Parts Database.
Import Options:

Selected Import Options are applied to the Imported Table.
Get All Sheets in the Workbook.
When enabled this Option retrives all sheets in the selected Excel Workbook.
If the Option is not enabled then only the first sheet found in the Excel work is opened.
Build Part Descriptions
This option will build a Part Descriptions for Capacitors, Resistors and Inductors if the Part Description is blank (empty) in the imported datasheet.
Example:
CAP CER 0.1uF ±10% 10V X5R 0402 (1005 Metric)
This option will build a Part Descriptions for Capacitors, Resistors and Inductors if the Part Description is blank (empty) in the imported datasheet.
Example:
CAP CER 0.1uF ±10% 10V X5R 0402 (1005 Metric)
The above description was built by concatenating fields (parameters):
Part Type, SubType, Value, Tolerance, Voltage Dielectric and Package Case
Use Preferred Names
This option can be used to create consistent Supplier and Mfr Names uisng data found in the mfrs_links and suppliers_link tables,
Make Library Paths
This option can be used to create Library Paths by prefixing Library Refs with Footprints\ or Symbols\ when a BOM is imported and the Library Ref parameter is included. Parts will attempt to build the Library Path if this option is enabled.
Paths are only created for records that have an empty (blank) Library Path and if Library files exist in the Footprints or Symbols folders.
Tip:
Tip:
Use Altium's Library Splitter Wizard to push library files to the Footprints and Symbols folders.
Update Time Stamps
This option can be used to modify the Updated_By and Updated_Date fields.
Notes:
When the Destination is the 'Parts' table and the ID column is not included in the Imported data ID numbers will be automatically generated using next available ID numbers.
Update Time Stamps
This option can be used to modify the Updated_By and Updated_Date fields.
Notes:
When the Destination is the 'Parts' table and the ID column is not included in the Imported data ID numbers will be automatically generated using next available ID numbers.
The Imported ID field must NOT contain a combination of blanks and ID values.
Required fields are determined by properties that are set in the Backend database.
New part numbers are appended and all records with matching IDs are updated.
Tips:
The Import data updates all records in the Parts table where the IDs in the Source data match the IDs in the Destination table.
Records in the source data are appended to the destination table where the IDs are not matched (new records).
Data in the Destination table will be overwritten with data from the Source table where the IDs are matched.
Use Compare if you want to review the changes and updates prior to importing the data.
That's It !
Data in the Destination table will be overwritten with data from the Source table where the IDs are matched.
Use Compare if you want to review the changes and updates prior to importing the data.
That's It !
Sunday, May 24, 2015
Required Fields
Required fields (user inputs) are determined by settings in the Backend database.
Please read before modifying fields in the Parts Backend. Parts fields can be changed, however Parts has been optimized for ease of use and performance.
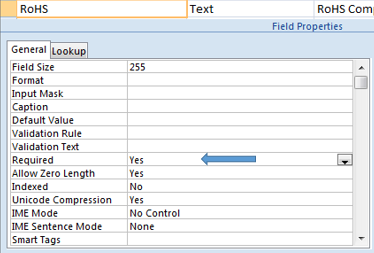
Example: To set RoHS as a user required input.
Open the Backend Parts table in the Design View.

Set the 'Required' property for RoHS to 'Yes" as shown below.
Tip 1: If you do NOT use Required fields in the Backend Parts table, you will have fewer nagging popup messages when you save records or scroll the records.
Tip 2: If you create Required Fields include a Default Value to avoid nagging messages.
Example: Required RoHS Field with Default Value set to "UnKnown"

Tip 3: For a nag free experience, set all fields Required property to No.

Tip 4: Importing Excel files will be simple if you do not use required fields.
Records can NOT be imported if the Excel data does not include the required fields.
Tip 5: To determine if you have required fields in the Backend Parts table.
Open the Parts table in the backend database in the design view.

Select a field and review the Required property setting for the field.

That's It !
Please read before modifying fields in the Parts Backend. Parts fields can be changed, however Parts has been optimized for ease of use and performance.
Example: To set RoHS as a user required input.
Open the Backend Parts table in the Design View.

Set the 'Required' property for RoHS to 'Yes" as shown below.

Tip 1: If you do NOT use Required fields in the Backend Parts table, you will have fewer nagging popup messages when you save records or scroll the records.
Tip 2: If you create Required Fields include a Default Value to avoid nagging messages.
Example: Required RoHS Field with Default Value set to "UnKnown"

Tip 3: For a nag free experience, set all fields Required property to No.

Tip 4: Importing Excel files will be simple if you do not use required fields.
Records can NOT be imported if the Excel data does not include the required fields.
Tip 5: To determine if you have required fields in the Backend Parts table.
Open the Parts table in the backend database in the design view.
Select a field and review the Required property setting for the field.
That's It !
Saturday, May 23, 2015
Use Company Part Numbers
By default Parts uses a unique incremented 'ID' to link the database to an Altium design.
Example DBLib or SVNDBLIB with Single lookup key set to use the ID field.
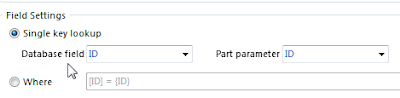
Using a unique key (ID) allows database parts to be linked to a design without the need to create company part numbers.
Company part numbers can easily be added before or after the design is released when a unique key (ID) is used as the lookup field.
For greater flexibility I highly recommend using the unique ID as the lookup key.
Suggested reading: PLM
In Parts MCN = Material Control Number (company part number)
That's It !
Saturday, April 11, 2015
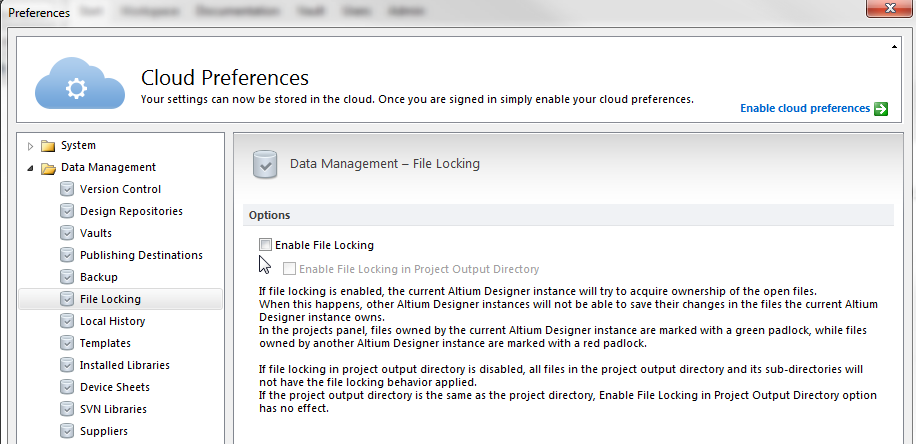
Warning - File Locking
Problem: Altium Warning - You will not be able to save your changes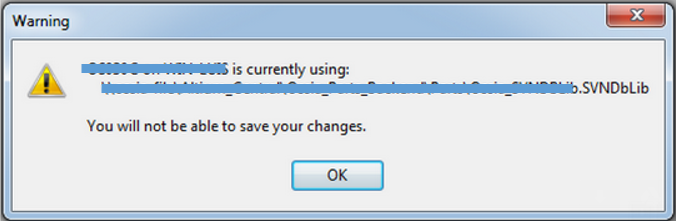
Fix: Disable the File Locking Option in DXP Preferences
Tools > DXP > Preferences File Locking
click on image to view
That's It !
Fix: Disable the File Locking Option in DXP Preferences
Tools > DXP > Preferences File Locking
click on image to view
That's It !
Friday, April 10, 2015
EOleException error executing
Provider cannot be found . . .
EOleException error raised in Altium DBLIB or SVNDBLIB when connecting to an Access Database.
Provider cannot be found. It may not be properly installed.
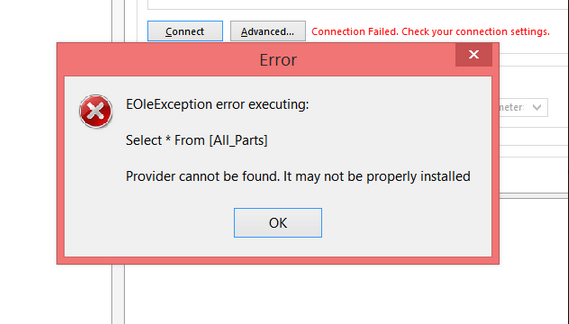
For AD17 and older 32bit versions of Altium DXP.
To fix this connection error install a 32 bit AccessDatabaseEngine.exe
Download 2010 AccessDatabaseEngine.exe
or
Download 2016 Access DatabaseEngine.exe
Read:
The 'Microsoft.ACE.OLEDB.12.0' provider is not registered on the local machine - ConnectionStrings.com
That's It !
EOleException error raised in Altium DBLIB or SVNDBLIB when connecting to an Access Database.
Provider cannot be found. It may not be properly installed.
For AD17 and older 32bit versions of Altium DXP.
To fix this connection error install a 32 bit AccessDatabaseEngine.exe
Download 2010 AccessDatabaseEngine.exe
or
Download 2016 Access DatabaseEngine.exe
Read:
The 'Microsoft.ACE.OLEDB.12.0' provider is not registered on the local machine - ConnectionStrings.com
That's It !
Tuesday, March 31, 2015
User Defined Fields
The Parts Frontend supports up to 15 user defined text fields.
YouTube Video User Defined Fields
Close all connections to the Database (Parts Backend) !
A database should not be re-designed while users are connected to the database.
If users are connected to Parts Database ask them to close their Parts Frontend applications and Altium connections while you modify the Parts Database.
Close all connections to the Database (Parts Backend) !
A database should not be re-designed while users are connected to the database.
If users are connected to Parts Database ask them to close their Parts Frontend applications and Altium connections while you modify the Parts Database.
To add a user defined field Select Configuration > User Defined Fields, enter the user defined fields and select Apply in the Configuration form.

Example. . . to add a field Named Package_Size to the Parts database.
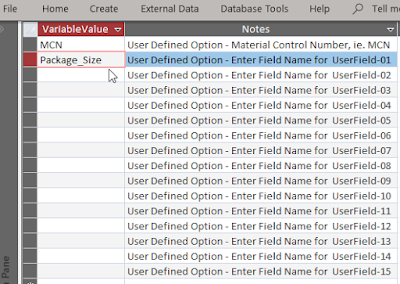
Close the form and select the Apply button in the Configuration dialog to create the fields.
Unbound fields are fields that are not linked to the main form.
To remove unbound fields use Tools > Configuration > Unbound Fields. Or edit the Parts Backend database.
Notes:
Parts configurations can be saved and loaded on local or shared drives.
Note for For MySQL databases User Defined Fields can be added using the Parts Frontend if the user named in the connection string has been given privileges and permissions to alter the MySQL database.
If the named user does NOT have permissions and privileges an ADO Error Handler message will pop up if the user attempts to alter (add fields) to the database.


Close the form and select the Apply button in the Configuration dialog to create the fields.
Unbound fields are fields that are not linked to the main form.
To remove unbound fields use Tools > Configuration > Unbound Fields. Or edit the Parts Backend database.
Notes:
Parts configurations can be saved and loaded on local or shared drives.
See Configuration > User Defined Fields > Part Status . . .
Parts Status choices may be defined in the Configuration options.
New;Released;Production;Deprecated;End of Life;Obsolete;
Related Link:
Monday, February 23, 2015
Linking Parts
Parts uses a Surrogate Key field (ID) to link the parts placed in an Altium design.
The ID filed is a simple incremented long integer which creates a flexible solution.
The ID field is a unique identifier.
The ID field is the Primary key in the Parts Backend table.
No Duplicates are allowed in the ID field.
By design user's do not need to create company part numbers before parts can be placed.
Creating company part numbers can be an exercise in futility. New designs often have parts that are evaluated and never used in the final design.
Parts also has a Lifecycle field that includes "Obsolete" and "Deprecated", which allows for identifying these parts in the CAD Library and on the BOM.
Company Part Numbers
Parts has an optional Material Control Number (MCN) field for company part numbers.
MCNs (company part numbers) are created in PLM systems to associate preferred and alternate manufacturer parts for production BOMs.
Typically company part numbers are assigned after a design has been released from engineering to production.
CAD libraries and schematics can be updated with MCNs using the unique ID field.
Parts has options for customizing the MCN field.
Related Link: PLM
That's It !
Tuesday, January 27, 2015
Compare
Compare is a Librarian only feature in the Parts Frontend application.
Click on image to view

How Compare works:
Compare stops at the first difference found and displays records with differences.
If differences are found the command buttons can be used to update the Destination table.
To find more differences the user must first reconcile the displayed differences.
If you would like to review the differences without changing any data in the Parts table you can Swap Tables and select Compare.
If you update the Imported table no changes are made to the Imported Excel file. The changes are only made to a temporary Imported table.
That's It !
Monday, January 19, 2015
BOM - With Supplier Links Enabled
I'm currently working on a fairly large project with 20 schematic pages, 225 line items, 1034 parts (Ref/Des).
Generating the Bill of Material is taking several minutes.

After a little troubleshooting I found that if I disabled the Suppliers in DXP Preferrences the BOM would generate in a few seconds, vice several minutes.

As shown below enabling the Suppliers Links will display real time Supplier Information in the Libraries Panel.

This is a nice feature when you are placing parts, but it comes at price when you want to configure or generate your BOM..
The reason for the performance hit is Altium searches the supplier websites looking for inventory and pricing for the 225 line items in the BOM, this takes a considerable amount of time.
If are using an Outjob to generate your BOM and you select Configure the configuration dialog will also take a few minutes to open if the Supplier Links are enabled.
Altium Bug Crunch #1508
Altium will freeze, but eventually thaw out and come back to life.
Work around 1:
To speed up the BOM un-check the Supplier Links in DXP Preferences before generating or configuring a BOM in the Outjob.

Interesting point:
In my Outjob BOM Configuration I have not selected stock or pricing information.

Supplier 1 and Supplier Part Number 1 are already in my design's database.
Why is Altium searching the Internet for Supplier Data?
Work Around 2:
Open the Parts Backend and rename Supplier 1 to Supplier and Supplier Part Number 1 to Supplier Part Number.
This will stop the long searches for supplier data on the web. However the Supplier details will not be visible in the Libraries panel.
You can quickly open Supplier Part Details or datasheets using right clicks in the library panel or schematic.

Related link: Supplier Data
That's It !
Generating the Bill of Material is taking several minutes.
After a little troubleshooting I found that if I disabled the Suppliers in DXP Preferrences the BOM would generate in a few seconds, vice several minutes.
As shown below enabling the Suppliers Links will display real time Supplier Information in the Libraries Panel.
This is a nice feature when you are placing parts, but it comes at price when you want to configure or generate your BOM..
The reason for the performance hit is Altium searches the supplier websites looking for inventory and pricing for the 225 line items in the BOM, this takes a considerable amount of time.
If are using an Outjob to generate your BOM and you select Configure the configuration dialog will also take a few minutes to open if the Supplier Links are enabled.
Altium Bug Crunch #1508
Altium will freeze, but eventually thaw out and come back to life.
Work around 1:
To speed up the BOM un-check the Supplier Links in DXP Preferences before generating or configuring a BOM in the Outjob.
Interesting point:
In my Outjob BOM Configuration I have not selected stock or pricing information.
Supplier 1 and Supplier Part Number 1 are already in my design's database.
Why is Altium searching the Internet for Supplier Data?
Work Around 2:
Open the Parts Backend and rename Supplier 1 to Supplier and Supplier Part Number 1 to Supplier Part Number.
This will stop the long searches for supplier data on the web. However the Supplier details will not be visible in the Libraries panel.
You can quickly open Supplier Part Details or datasheets using right clicks in the library panel or schematic.

Related link: Supplier Data
That's It !
Saturday, January 10, 2015
Supplier Information - Review
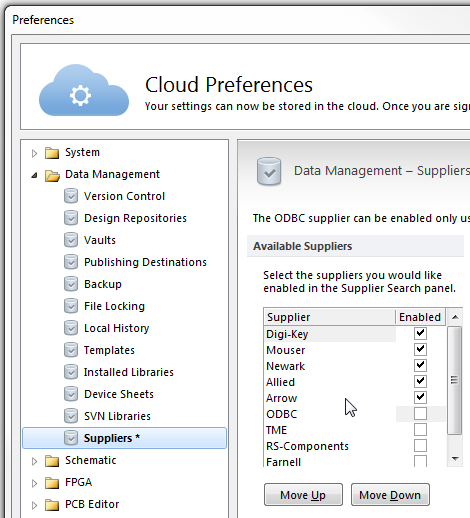
Suppliers enabled in DXP > Preferences > Data Management > Suppliers
Results of Supplier Information displayed in Altium's Libraries Panel for 5 major suppliers listed alphabetically for the same part number.
To display Supplier data in the libraries panel the Supplier name in the parameters must match the names listed in DXP Preferrences for the supplier.
Note the parameters in the design must include Supplier 1 and Supplier Part Number 1 to display the Supplier data.
The Parts database has options to use to use Supplier and Supplier Part Number vice Supplier 1 and Supplier Part Number 1. This option is controlled by the field names used in the Parts backend.
Please note the results shown below are not associated with the Parts application. The supplier information is handled completely by Altium's supplier plugins.
Allied (no image for the connector)

Arrow (nothing displayed)

Digi-key (nice)
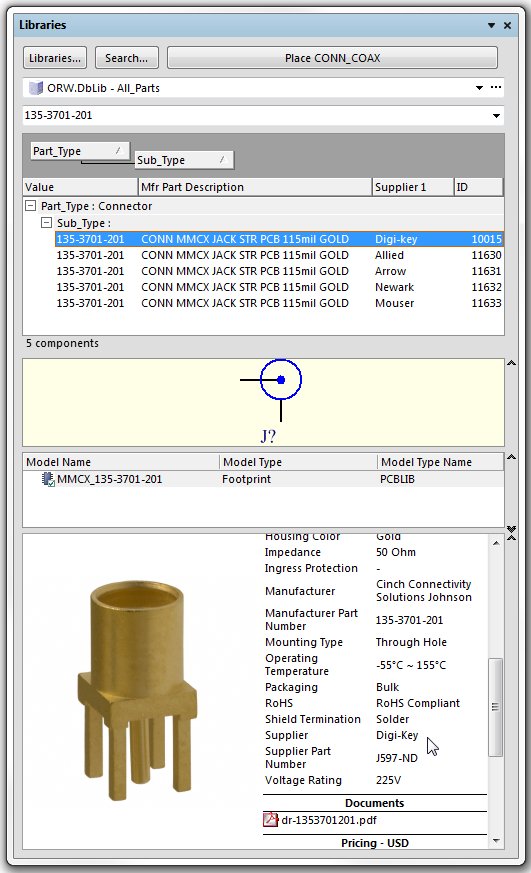
Mouser (nice)

Newark (nice)

Altium Version: AD14.3.16
Score 3.5 out of 5.
Related link: BOM with Supplier Data
That's It !
Results of Supplier Information displayed in Altium's Libraries Panel for 5 major suppliers listed alphabetically for the same part number.
To display Supplier data in the libraries panel the Supplier name in the parameters must match the names listed in DXP Preferrences for the supplier.
Note the parameters in the design must include Supplier 1 and Supplier Part Number 1 to display the Supplier data.
The Parts database has options to use to use Supplier and Supplier Part Number vice Supplier 1 and Supplier Part Number 1. This option is controlled by the field names used in the Parts backend.
Please note the results shown below are not associated with the Parts application. The supplier information is handled completely by Altium's supplier plugins.
Allied (no image for the connector)
Arrow (nothing displayed)
Digi-key (nice)
Mouser (nice)
Newark (nice)
Altium Version: AD14.3.16
Score 3.5 out of 5.
Related link: BOM with Supplier Data
That's It !
Subscribe to:
Posts (Atom)