Display Supplier Information in the Altium Libraries Panel
click on image to view
Edit DXP preferences to display Supplier Information.
DXP > Preferences > Data Management > Suppliers
Select Digi-Key and Mouser, apply changes, refresh the library panel.
The Supplier Information in the Libraries Panel is handled by Altium Supplier plugins.
Two fields in the Parts Backend were renamed to support the Supplier Information.
Supplier changed to Supplier 1
Supplier Part Number changed to Supplier part Number 1
Note: The Supplier Names entered in the Parts Backend Database must match the names in DXP > Preferences > Data Management > Suppliers
Example: Enter Digi-Key (not Digikey) in the Parts Supplier 1 field.
Related Link: Supplier Information Review.
That's It !
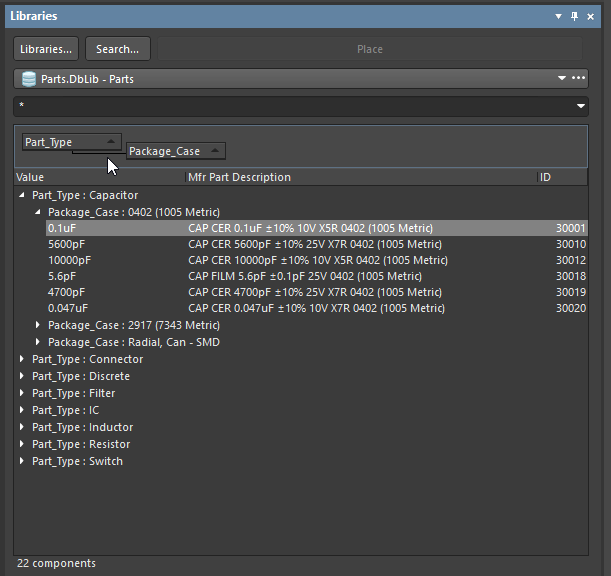
You can quickly organize Parts displayed in the Library Panel by dragging and dropping columns to the grouping bar as shown below.
Right click in the Libraries Panel, Select Columns and Organize the database view by grouping the fields as shown below. i.e. Part Type, Sub Type and Package Case.
Click on images to view
You can quickly drill down to 0402, 0603, 0805, etc . . . size parts
If you need 1% or 5% tolerance parts add the Tolerance column to the parts grouping.
With a little imagination you can easily and quickly create several options as needed for your current project.
Related Links:
Part Types
Lifecycle
That's It !
When you place a part from the Libraries Panel if the part has multiple footprints listed in the database, then the default footprint in the design will be determined by the footprint assigned to Footprint Ref.
For example if the backend database has three footprint choices:
Footprint Ref is CAPC1005X55L (least)
Footprint Ref 2 is CAPC1005X55N (nominal)
Footprint Ref 3 is 0402_RND (custom)
In the Library Panel these footprints are listed in alphabetical order with check mark applied to the default footprint.
Here is the database view using Parts Frontend
Note as shown in the Libraries Panel CAPC1005X55L is the default, because it is assigned to Footprint Ref.
Tips:
1) Prior to placing a part you can select the desired footprint the Libraries Panel..
2) After placement you add more footprints to a component if desired.
3) After placement use Tools > Footprint Manager to organize and select preferred footprints in the schematic, then update the PCB with the changes.
4) If you only have access to the *.PCBdoc then use Find Similiar > PCB Inspector to select and change the footprints.